Week 13-14 - Character Movement Control
I spent these two weeks on making the character movement control.
One-Hand Mobile Controls
After the research done in the interim report, we decided to make the game in portrait mode due to the following reasons:
-
Convenience: Mobile devices are usually used in portrait mode.
-
Single-hand playability: Player can play our game with only one hand. So it would be a nice choice when players are in subways or busy with other things in real life.
-
Immersive gameplay experience: Having a narrow gameplay view is suitable for our game to enhance the feelings of being alone and not to trust others.
Normally, 3D mobile games that allow players to control the camera require two separate inputs for the player movement and control over the camera, in addition to buttons for specific actions. For example, in the games Bleach Mobile 3D and PUBG Mobile in the following figure, the player can move the character with the fixed joystick with their left hands. While at the same time, players can also drag along the rest of the screen to control the camera direction.
Sources: Bleach Mobile 3D App (left) and PUBG Mobile App (right)
With this control scheme, it is super smooth for the player as they can just drag the joystick to font and control the direction they are facing through the camera. However, this cannot be done without two separate inputs. And this also not suit our concept as a one-hand game. So we decide to make the direction the camera facing to be automatic as to avoid two-hand control.
Moreover, we believe that a fixed joystick on screen isn’t suitable for one-hand control. The reason is simple but yet critical. Players will feel extremely restricted and get tired to always put the thumb on the same position on the screen, especially with one hand. As a result, we looked into the floating joystick, which allows players to set the joystick according to the initial touchpoint on the screen.
Lastly, in the portrait game mode, there aren’t many spaces for the UI. Instead of having buttons for different actions. We decided to simplify all the actions performed as one input. Thinking of that, we believe we may as well don’t use any UI button for the action but the gesture tap instead to keep the screen clean and neat.
Fig. 13. The Improved User Interface Design.
We followed our UI design that we included the interim report, making improvements to suit the points mentioned before. We made changes to two input methods as highlighted in green in the above figure.
First of all, we made it so dragging the upper part of the screen allowed the player to control the camera’s direction. This allows the player to look around the game environment with ease.
Secondly, we made it so tapping within the joystick region will issue an action command depending on the currently equipped item. This allows us to free up screen space that would have otherwise been occupied by virtual buttons.
.png)
.png)
.jpg)
.png)
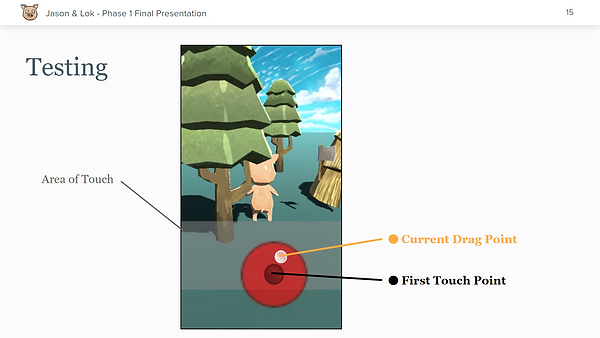
Floating Joystick
We first set up an image at the lower part of the gaming screen. Then, by adding the IDragHandler, IPointerUpHandler, IPointerDownHandler in the script we can use the touch event in the game.
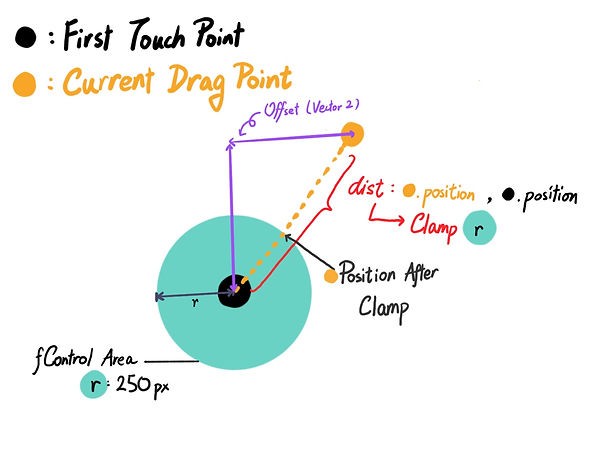
To make a custom floating joystick, we need to set up the joystick position according to the first touch on the screen. We simply save the first touch position using OnPointerDown. Then, whenever players are dragging the knob, we can get the current drag position.
Fig. 16. The Implementation of the Floating Joystick.
To control the direction of the player movement, we first calculate the offset between the first touch position and the current drag position. Then we use the ClampMagnitude function to make it easy to read and use. Then we can apply the translate method to move the pig around.
We also calculate the distance between the first touch position and the current drag position for the speed. After that, we clamp the value to the radius of the fControlArea to prevent the character from moving too fast. Then I divided the value to the radius of the fControlArea. Now it will give out a float from 0 to the radius of the fControlArea if the current drag position is inside the fControlArea. It will always give out the value 1 if the player moves the knob outside the area as the fastest speed.
The joystick is only enabled when player touch and drag within the touchable region. It will give out the Vector 2 direction for the player to move around.
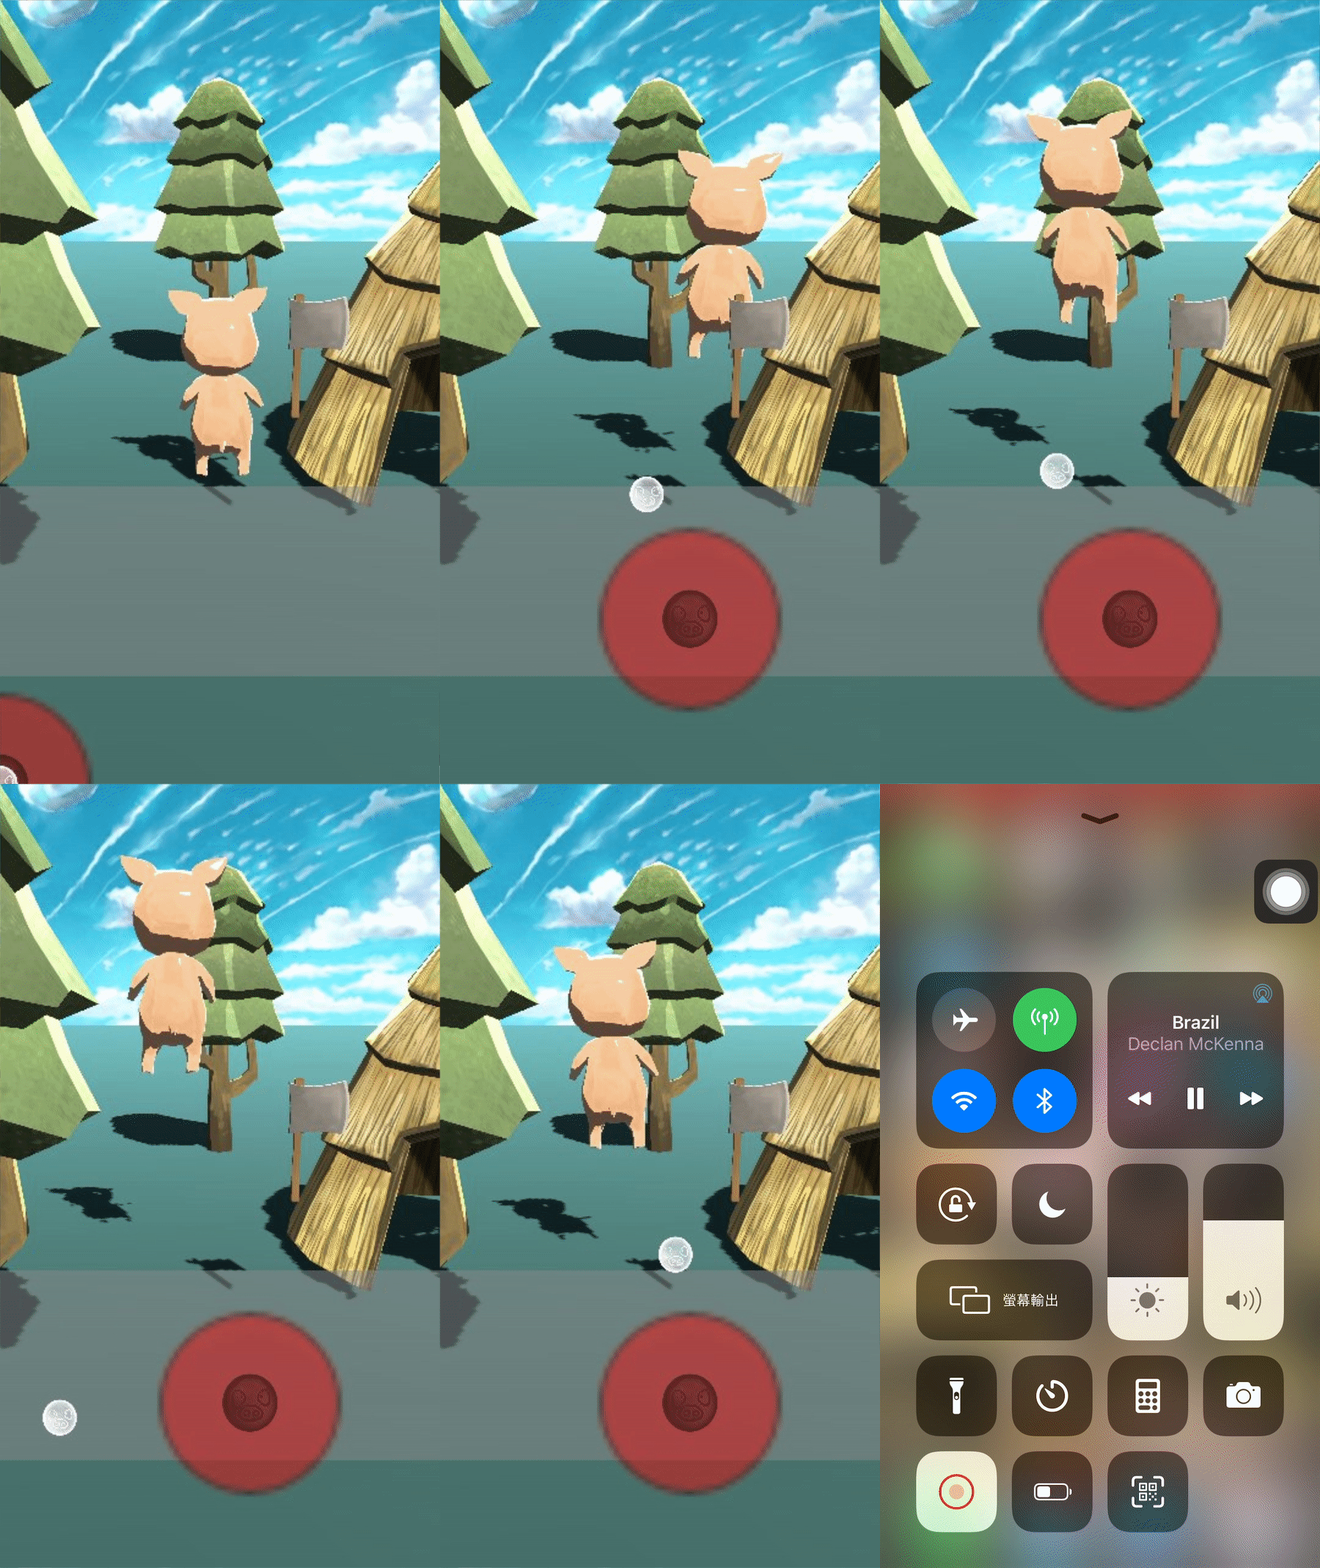
Fig. 17. Testing of the Floating Joystick & gif.
Translation, Rotation, and Camera
At first, I tried to use Quaternion.LookRotation for the pig to rotate to the direction he is going to according to the input from the joystick. But it only works for the first turn and it will be messed up after that. It is because I am using the global position for the rotation. Then, I tried to use the Pig character’s Vector3.forward and Vector3.right to translate the character. It is ok for the pig to move forward but not ok for the pig to move to the front right and front left as it will keep spinning again and again at the same place. It is because the pig character will have a new Vector3.right in every update. Actually, this is what I want but it turns too fast (see fig. 18).
Fig. 18. Turning the Pig.
So I try to time the Vector3.right with an extremely small value and Time.deltaTime to test. Now the moving direction is ok but the character is not facing where he is moving. I cannot solve this problem at the moment and I go for the camera following test. And I find out one more problem is that if the camera always pointing at the back of the character pig, it is hard to tell if the pig is turning or not. It is not as enjoyable and intuitive as we want.
At last, we create a parent game object on the pig character. The coding for the movement is as follow:
*PlayerLocalPos is not the model of the pig but the parent of it with a rigid body and a collider.
PlayerLocalPos is for the camera to follow and we use the Vector3.forward and Vector3.right of it to control the movement. The PlayerLocalPos can thus according to the camera facing to move to the right font or left font. Then, the pig character is rotating according to the input value.
However, it is still hard for the player to move forward as if the input value direction.x != 0, the camera will keep rotating. It was solved by adding an if-else function according to the joystick input.y.
Fig. 19. Joystick Regions.
Now the camera moves when the pig moves to the front left or front right. The pig character will always face the direction according to the joystick input even the pig is facing the camera. The movement script is finished.
Manual Camera Rotation
Although now the camera will follow the player when the player moves to the front left and front right. it is not enough since we can’t rotate the pig character with the camera. Thus players cannot make a sudden turn or look back. Therefore, we created a region for rotating the camera on the upper part of the canvas.
Tap Action
The tap action is simple. It stores the game time when the player is first touched on the screen. And when the player releases the finger, it stores the game time again. If the time releasing the finger - the time player first touches the screen < a certain amount. It will be considered as a tap and will perform the action. Using this method instead of a fixed button, players can thus tap on anywhere in the region to perform an action.
.jpg)
.jpg)


